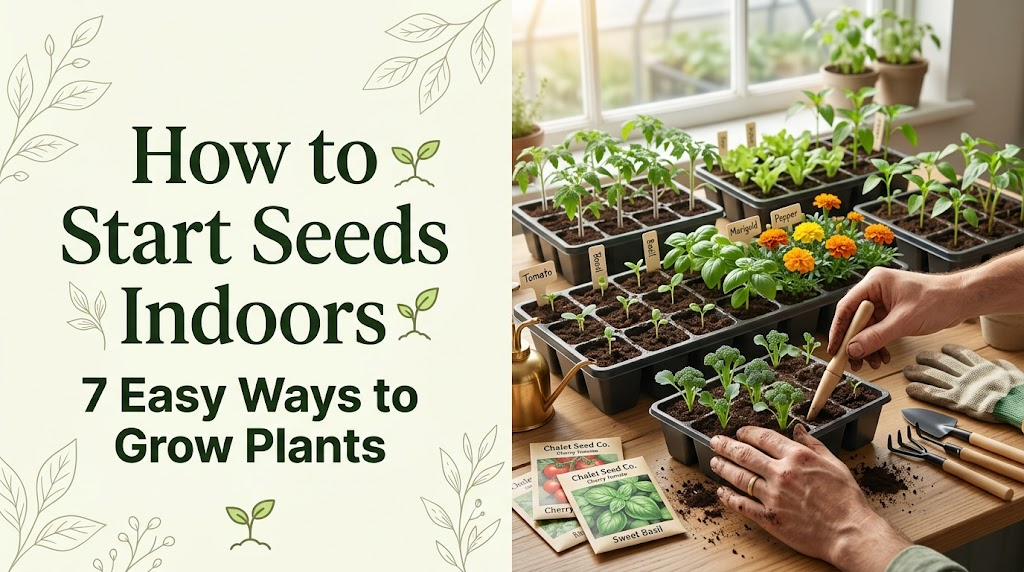

Starting seeds indoors gives vegetables, herbs, and flowers a protected head start before outdoor planting. This guide takes you from seed packet to transplant-ready seedling without overcomplicating the process.
| Quick answer To start seeds indoors, choose crops suited to transplanting, work backward from your local last expected frost date, sow into a clean container filled with lightweight seed-starting mix, keep the medium evenly moist and appropriately warm, then give seedlings strong light as soon as they emerge. Thin or pot them up as needed, grow them under steady conditions, and harden them off gradually before planting outdoors. |
Key Takeaways
- Time the sowing, not just the season. Use the seed packet and your average last frost date to decide when to start each crop.
- Use a seed-starting medium. A lightweight, clean, well-drained mix is more reliable than dense garden soil for germination.
- Warmth helps germination; light drives seedling growth. Once seedlings emerge, strong, consistent light is one of the biggest factors in keeping them compact.
- Moist is good; soggy is not. Seeds need water and oxygen, so waterlogging can reduce germination and increase disease risk.
- Do not skip hardening off. Indoor-grown seedlings need gradual exposure to sun, wind, and outdoor temperature swings before transplanting.
Why Start Seeds Indoors?
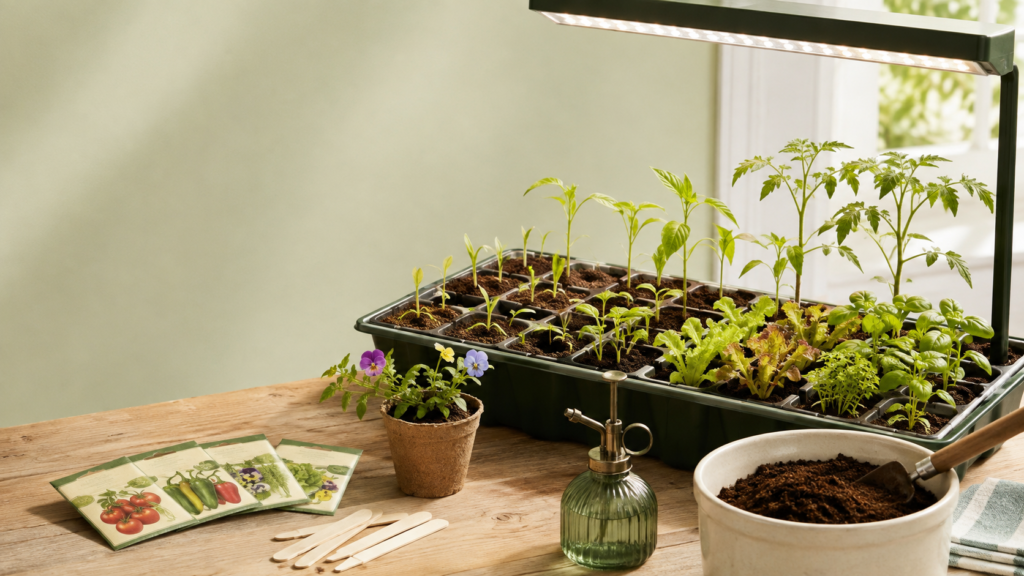
Starting from seed can cost less than buying many nursery transplants, gives you access to far more varieties, and lets you get a head start when outdoor soil and air temperatures are still unsuitable for tender plants. It is especially useful for crops such as tomatoes, peppers, eggplants, and many flowers that need a longer protected growing period before they can safely move outside.
Indoor seed starting is not mandatory for every plant. The goal is not to bring the entire garden into the house; it is to start the plants that benefit from extra protected growing time and direct-sow the plants that establish more easily where they will stay.
Do You Have to Start Seeds Indoors?
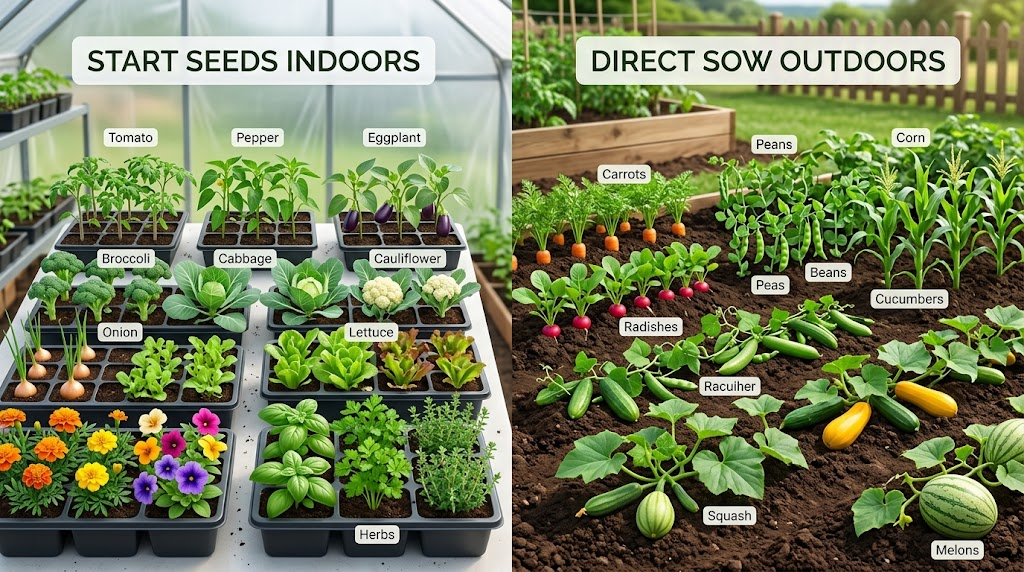
No. Some plants are excellent candidates for transplanting, while others are usually simpler to sow directly outdoors. Climate, variety, season length, and the crop’s sensitivity to root disturbance can all change the best approach.
| Often worth starting indoors | Often direct sown | Notes |
| Tomatoes, peppers, eggplants | Carrots, radishes | Root crops are commonly direct sown because disturbing the developing root can reduce quality. |
| Broccoli, cabbage, cauliflower | Peas, beans | Peas and beans establish quickly outdoors when conditions are suitable. |
| Onions and some lettuces | Corn | Corn is commonly direct sown; transplanting is possible in special situations but is not usually necessary. |
| Many annual flowers and tender herbs | Cucumbers, squash, melons | Cucurbits can be started indoors for a short head start, but young plants dislike prolonged root restriction. |
| Beginner rule Read the seed packet first. It often tells you whether to start indoors or direct sow, how deep to plant, approximately how long germination takes, and when the seedlings should be ready to move outside. |
When Should You Start Seeds Indoors?
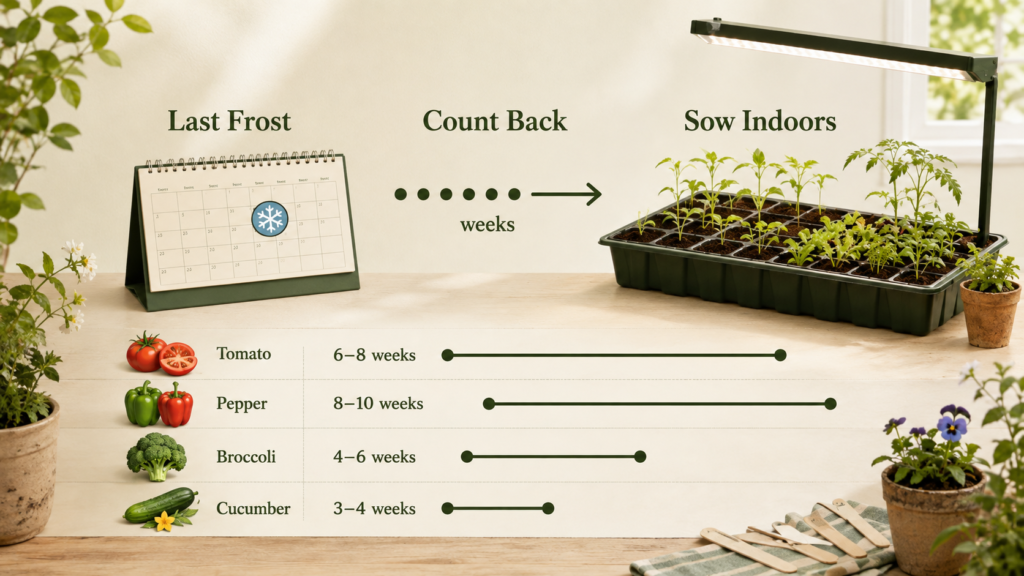
The best starting date is based on the plant, not a single date for the whole garden. Find your area’s average last spring frost date, then count backward by the indoor growing time recommended for that crop. Warm-season vegetables usually go outdoors after frost danger has passed and temperatures have warmed; cool-season crops may be transplanted earlier.
A simple seed-starting formula
| Sowing date = target transplant date − recommended indoor growing time Example: if you plan to transplant tomatoes after your local frost risk has passed and the seed packet recommends starting them 6 to 8 weeks before transplanting, count backward 6 to 8 weeks from that target date. Do not start extra early “just in case”—overgrown, crowded seedlings can become harder to manage. |
General indoor seed-starting timing chart
These are useful planning ranges, not universal dates. Variety instructions and local conditions should take priority.
| Crop | Typical indoor growing time | Outdoor timing / note |
| Onions | About 9–11 weeks | Often transplanted several weeks before the last frost, depending on type and local conditions. |
| Peppers | About 6–8 weeks | Move outside only after cold risk has passed and conditions are warm. |
| Tomatoes | About 6–8 weeks | Commonly transplanted after the last frost when weather and soil have warmed. |
| Eggplants | About 6–8 weeks | Warm-season crop; avoid cold outdoor conditions. |
| Broccoli | About 4–6 weeks | Cool-season crop that can often be transplanted before the last frost. |
| Cabbage | About 4–6 weeks | Cool-season crop; timing depends on desired spring or fall crop. |
| Lettuce | About 4–6 weeks | Can be transplanted in cool conditions; avoid keeping starts indoors too long. |
| Cucumber / squash / melon | About 3–4 weeks | Keep indoor period short to limit root disturbance; direct sowing is also common. |
What about Zone 6?
A hardiness zone is helpful for understanding broad winter cold patterns, but it is not a precise seed-starting calendar. Two locations in the same zone can have different frost dates and spring weather. For a Zone 6 garden, use your local average frost date and the crop’s recommended lead time rather than relying on one universal “Zone 6 starting date.”
What You Need to Start Seeds Indoors
You can start seeds successfully without building a miniature greenhouse. A simple setup is usually enough; extra equipment becomes useful when your growing space is cool, dark, crowded, or difficult to manage.
Essentials
- Seeds. Use fresh, correctly stored seed and check the packet for crop-specific instructions.
- Containers with drainage. Cell trays, small pots, recycled containers with drainage holes, or other clean seed-starting containers can work.
- Seed-starting mix. Choose a fine, lightweight, well-drained medium intended for germination.
- Water. A gentle mister or bottom-watering tray helps avoid displacing newly sown seeds.
- Labels. Record the plant or variety and sowing date.
- Adequate light after emergence. Bright supplemental lighting is often more reliable than a windowsill alone for producing compact seedlings.
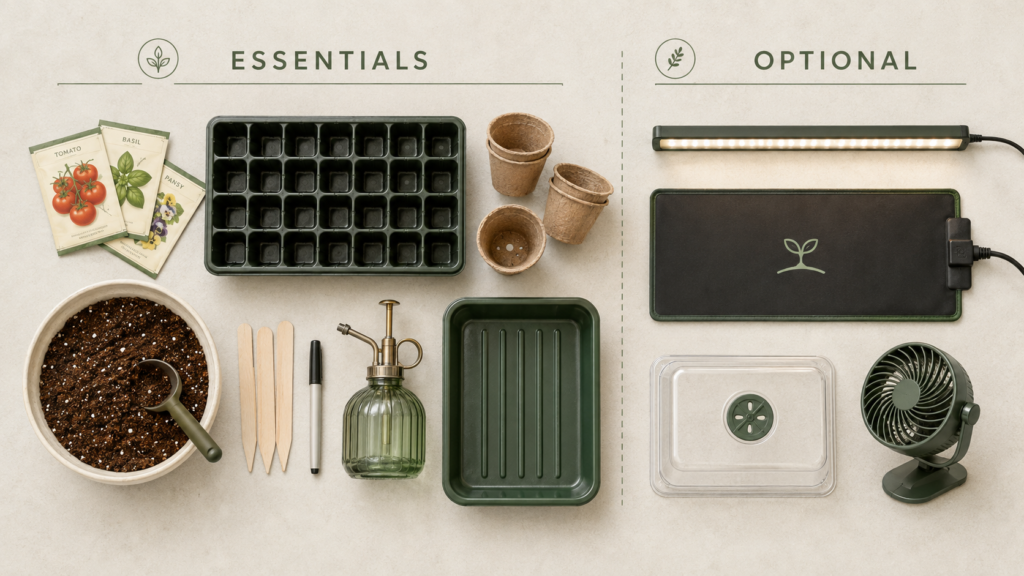
Helpful but optional
- Heat mat. Useful for warmth-loving seeds or cool rooms; not every crop needs extra heat.
- Clear cover or humidity dome. Helps retain moisture during germination; remove or ventilate promptly after seedlings emerge.
- Small fan. Gentle airflow can improve air movement around growing seedlings.
- Timer. Makes a consistent grow-light schedule easier to maintain.
What Is the Best Soil for Starting Seeds Indoors?
For germination, use a seed-starting mix rather than digging soil from the garden. A good germination medium is lightweight, porous, clean, and well drained. Dense garden soil can compact in small cells, drain poorly, and introduce organisms that are harder to manage indoors.
| Growing medium | Best use | What to know |
| Seed-starting mix | Germination and very young seedlings | Fine texture, good drainage, and relatively low fertility make it easier to manage moisture around tiny roots. |
| Potting mix | Potting up established seedlings | Often coarser and may contain more nutrients than a germination mix. |
| Garden soil | Usually skip for indoor seed trays | Can be heavy, compacted, inconsistent, and more likely to carry pests or disease organisms indoors. |
How to Start Seeds Indoors Step by Step
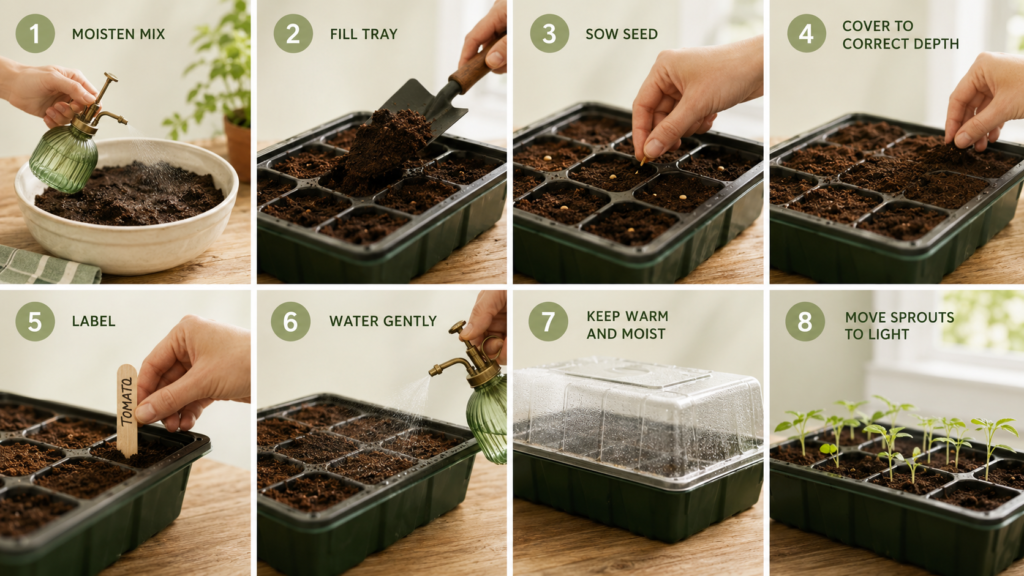
1. Choose the seeds and read the packet
Check whether the crop is recommended for indoor starting, how many weeks before transplanting to sow it, planting depth, germination temperature, and any unusual requirements. Some species need light to germinate; others germinate better when covered.
2. Moisten the seed-starting mix
Pre-moisten the mix until it feels evenly damp but not dripping. Starting with an evenly moist medium is easier than trying to soak dry mix after tiny seeds are in place.
3. Fill clean containers
Fill the tray or pots without packing the mix into a hard block. Lightly firm the surface and make sure drainage holes are open.
4. Sow at the correct depth
Follow the seed packet. A common general guideline is to cover many seeds only to about one or two times their diameter, while very fine seeds and light-requiring seeds may be surface sown. Packet instructions win over rules of thumb.
5. Label the tray
Write the crop or variety and the sowing date. Labels prevent mix-ups and make it much easier to judge whether germination is on schedule.
6. Water gently
Mist the surface or set the container in a shallow tray of water and allow moisture to wick upward. Remove it once the mix is evenly moist so containers do not sit continuously in water.
7. Provide the right warmth and moisture
Keep the mix consistently moist while seeds absorb water and begin germination. A clear cover can reduce moisture loss, but avoid sealing trays in direct hot sun. Use a heat mat only when the crop and room temperature justify it.
8. Move quickly to seedling conditions after emergence
As soon as green shoots appear, remove the cover and give seedlings strong light. Seedling-growing temperatures are often cooler than optimum germination temperatures, so continued high heat is not always helpful.
How Germination Works
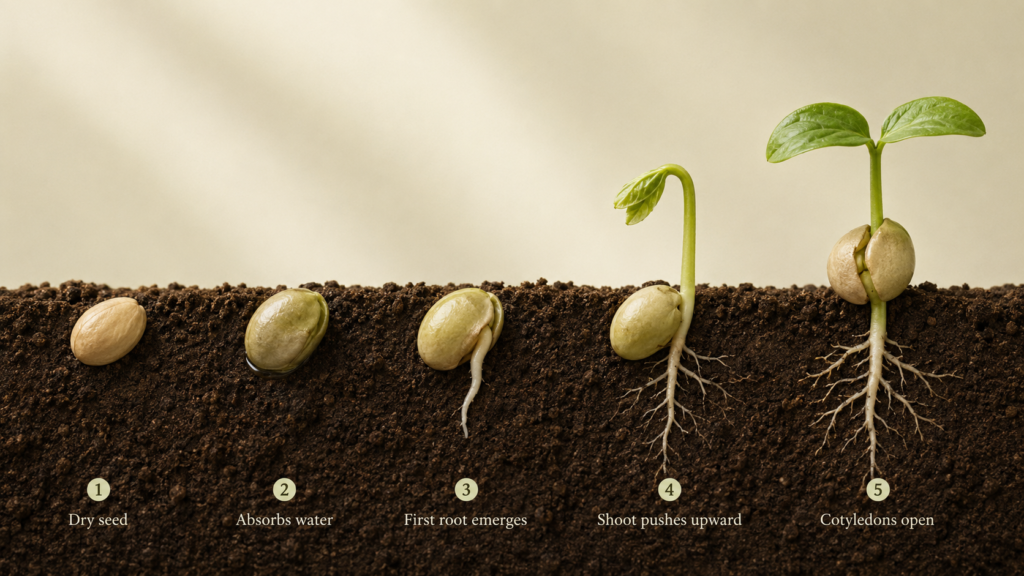
Germination begins when a viable seed absorbs water under suitable conditions. The seed’s metabolism becomes active, the root emerges first, and the shoot follows. The exact requirements vary by species, but successful germination usually depends on the combination of viable seed, moisture, oxygen, an appropriate temperature, and—for some seeds—the correct light or darkness conditions.
How long do seeds take to germinate indoors?
There is no single germination time. Some seeds emerge within a few days; others may need one or more weeks. Temperature, seed age, planting depth, moisture, and species all affect the result. Check the packet before assuming a slow seed has failed.
How to germinate seeds faster indoors
- Use the correct temperature. A seed that is too cold may germinate slowly or unevenly, while excessive heat can also be harmful.
- Keep moisture consistent. Do not let a seed repeatedly dry out after it begins absorbing water, but avoid saturating the mix.
- Plant at the right depth. Seedlings planted too deeply may use their stored energy before reaching the surface.
- Use fresh seed when possible. Germination rates can decline as seed ages, depending on species and storage conditions.
- Use seed treatments only when appropriate. Some species benefit from soaking, scarification, or a cold-moist stratification period; many common vegetable seeds do not need these steps.
What to Do After Seeds Sprout
The moment seedlings emerge, your priorities change. During germination, moisture and temperature were the main focus. After emergence, light becomes critical. Remove clear covers, place seedlings under strong light, keep air moving, and begin monitoring the mix rather than keeping it constantly saturated.
How Much Light Do Seedlings Need?
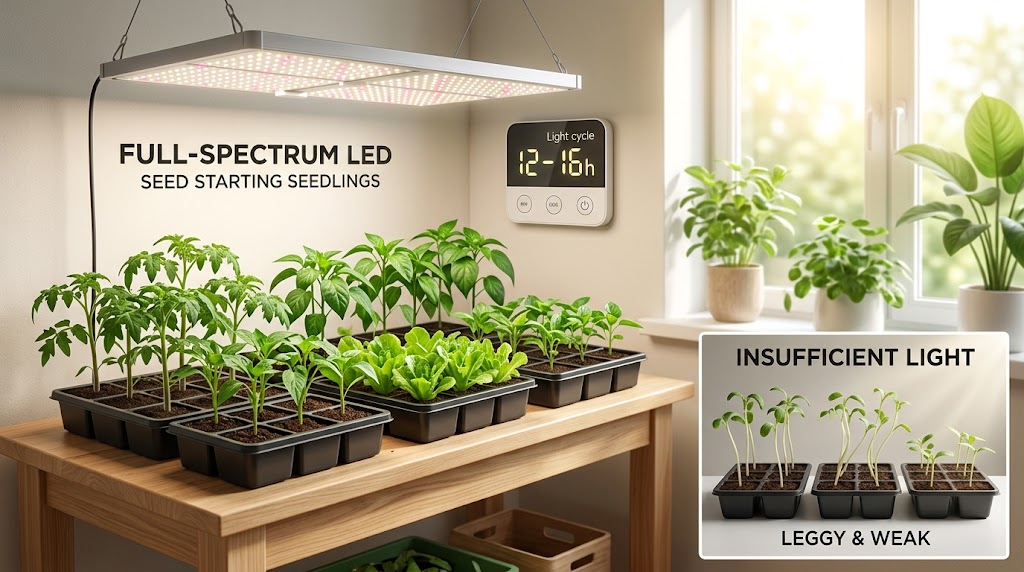
Indoor seedlings usually need long, bright days to stay compact. Extension guidance commonly recommends roughly 12 to 16 hours of light per day after germination. A timer makes consistency easy. The exact safe distance between the plant and a fixture depends on the light type and output, so use the fixture manufacturer’s guidance and watch the seedlings rather than assuming one distance works for every lamp.
A sunny window can work for some plants and seasons, but insufficient light is one of the most common causes of tall, thin seedlings. If seedlings lean strongly, stretch rapidly, or develop long weak stems, increase usable light and reassess spacing, temperature, watering, and crowding.
How to Water Seedlings Indoors
Aim for even moisture without keeping roots waterlogged. Check the growing medium instead of following a rigid calendar. When the surface begins to dry, water thoroughly enough to moisten the root zone, then allow excess water to drain. Bottom watering is useful because it reduces splash and avoids knocking over tender stems, but trays should not remain full of standing water.
| Avoid a fixed “water every X days” rule Small cells dry faster than large pots; warm rooms dry faster than cool rooms; bright lights increase water use; and different mixes hold different amounts of water. The plant and medium should determine the schedule. |
How to Grow Strong, Stocky Seedlings
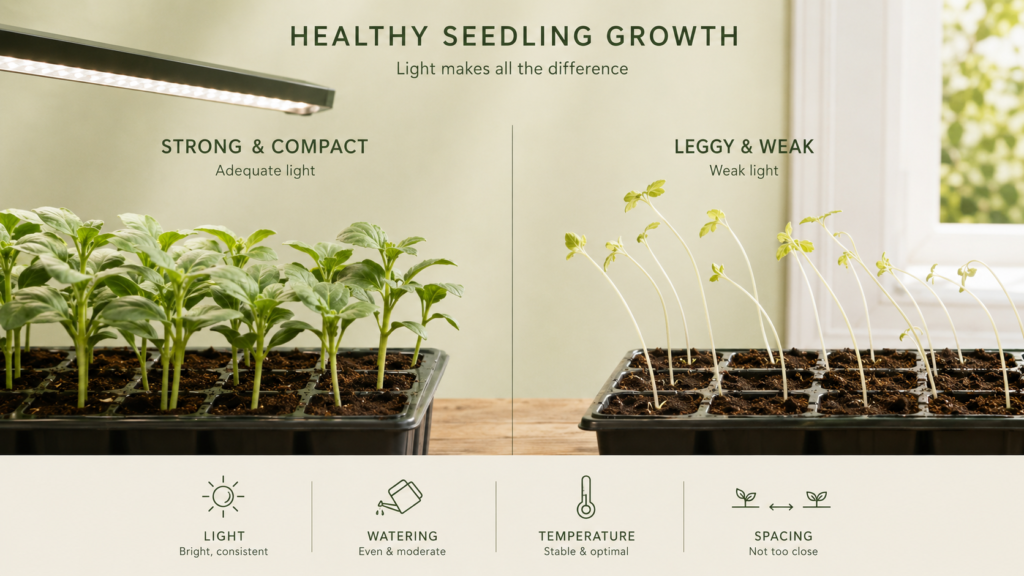
Strong seedlings are compact, well lit, evenly watered, and not overcrowded. Height by itself is not a sign of success. In fact, rapid stretching often means the plant is trying to reach more light.
- Provide strong light. This is the first thing to check when seedlings become leggy.
- Avoid excessive warmth after germination. Many seedlings grow better at somewhat cooler temperatures than seeds require for germination.
- Water correctly. Continually saturated mix reduces oxygen around roots and can encourage disease.
- Give seedlings room. Crowding increases competition for light and reduces airflow.
- Add gentle air movement. Good ventilation helps the surface dry normally and reduces stagnant humid conditions.
- Feed appropriately, not aggressively. Too much fertilizer does not compensate for weak light and can create problems of its own.
When should you thin seedlings?
If several seedlings grow in one small cell, thin them before they become crowded. When seedlings have developed their first true leaves and you can identify the strongest plant, snip the extras at the soil line with clean scissors. Cutting instead of pulling can reduce disturbance to the roots of the seedling you want to keep.
When should you fertilize seedlings?
Seeds contain stored energy for germination, so very young seedlings do not need heavy feeding. Once seedlings are actively growing and have true leaves, a dilute fertilizer may be appropriate if the growing mix does not already contain nutrients. Follow the fertilizer label and the needs of the crop. Organic fertilizer can be used, but “organic” does not mean “more is better”; concentration and timing still matter.
When should you pot up seedlings?
Pot up when seedlings have outgrown their starting cells, roots are filling the plug, or plants are becoming crowded before outdoor conditions are ready. Move them into a slightly larger container with an appropriate potting medium and handle delicate stems carefully. Avoid keeping fast-growing transplants in tiny cells for many extra weeks.
How big should plants be after four weeks indoors?
There is no universal four-week height. A tomato, pepper, lettuce seedling, and marigold can all grow at very different rates even under good conditions. Instead of chasing a height target, look for healthy green color, compact spacing between leaves, a sturdy stem, true leaves, active new growth, and roots that are developing without being severely crowded.
Common Indoor Seed-Starting Problems
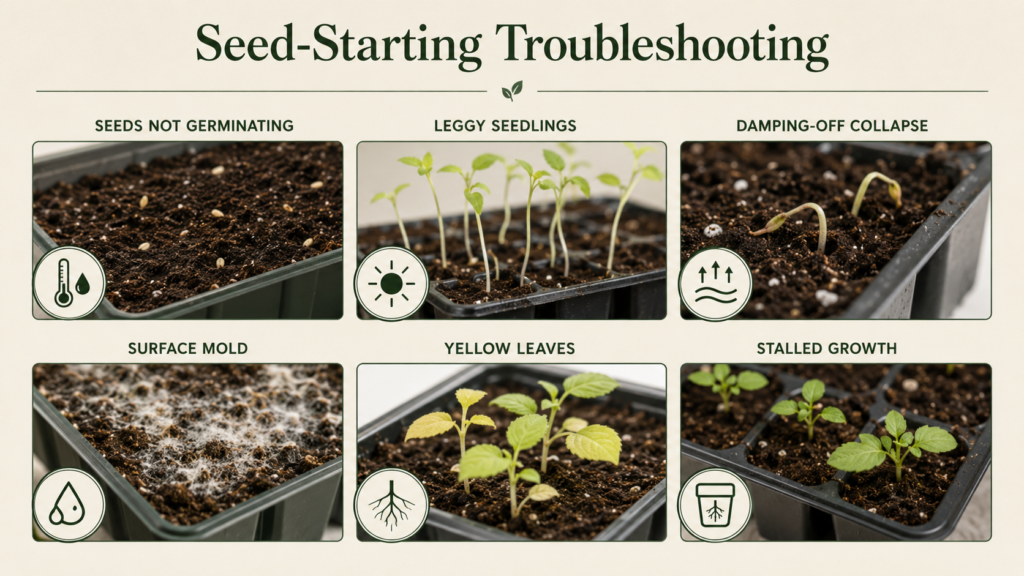
| Problem | Likely causes | What to check first |
| Seeds do not germinate | Old seed, incorrect depth, inconsistent moisture, unsuitable temperature, species-specific dormancy | Packet requirements, seed age, moisture and growing-medium temperature. |
| Tall, thin seedlings | Insufficient light, excessive warmth, crowding, overwatering or overfeeding | Increase usable light; review spacing, temperature and watering. |
| Seedlings collapse at soil line | Possible damping-off | Use clean containers and mix; reduce excess moisture and crowding; improve ventilation. |
| Mold on the mix | Excess moisture and stagnant air are common contributors | Remove unnecessary cover, improve airflow and allow the surface to dry normally. |
| Yellow or pale leaves | Watering, nutrition, temperature, roots or light may be involved | Check the root zone and environment before automatically adding fertilizer. |
| Growth stalls | Cold conditions, weak light, root restriction, water stress or other crop-specific issues | Inspect light, temperature, moisture and root space systematically. |
What is damping-off?
Damping-off is a disease problem that can rot seeds before emergence or cause young seedlings to collapse near the soil line. It is associated with several soilborne pathogens and is favored by conditions such as excessive moisture, crowding, and poor drainage. Prevention is far more practical than trying to rescue badly affected seedlings: use clean containers, clean seed-starting media, sensible watering, and good air movement.
Easy Seeds to Grow Indoors for Beginners
For a first seed-starting project, choose plants with straightforward requirements and a reasonably fast response. Tomatoes, lettuce, basil, broccoli, cabbage, marigolds, zinnias, and many other common garden plants can be beginner-friendly when their timing and temperature needs are respected. Peppers are also popular, although their germination can be slower and they appreciate warmth.
| Fast germination is not the same as fast maturity A seed may sprout quickly but still take months to become a harvestable or flowering plant. When comparing “fast-growing plants from seed,” separate germination speed from the time needed to reach useful or mature growth. |
From Seed to Plant: The Indoor Seedling Timeline
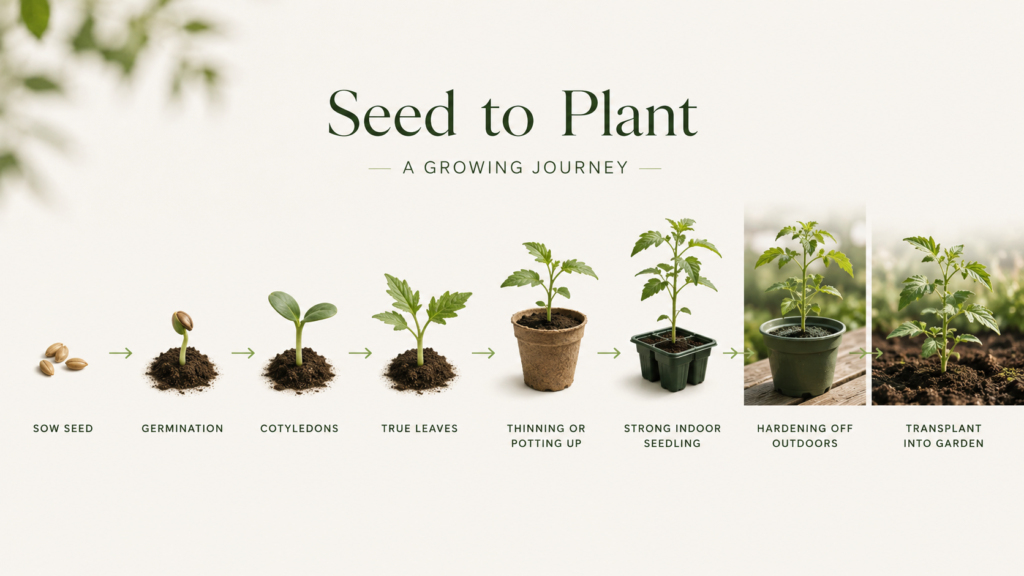
1. Sow the seed in a suitable starting medium.
2. The seed absorbs water and germination begins.
3. The root emerges, followed by the shoot.
4. Cotyledons (seed leaves) open and begin supporting early growth.
5. True leaves develop and the seedling begins to look more like the mature plant.
6. Thin crowded seedlings and pot up plants that need more root space.
7. Grow under strong light with appropriate water, temperature, airflow, and nutrition.
8. Harden seedlings off outdoors gradually.
9. Transplant into the garden or final outdoor container at the appropriate time.
How to Harden Off Seedlings
Seedlings raised indoors have not experienced full outdoor sun, drying wind, cool nights, or sudden weather changes. Moving them directly from a protected room to the garden can scorch leaves or shock the plant. Hardening off gradually acclimates them to those conditions.
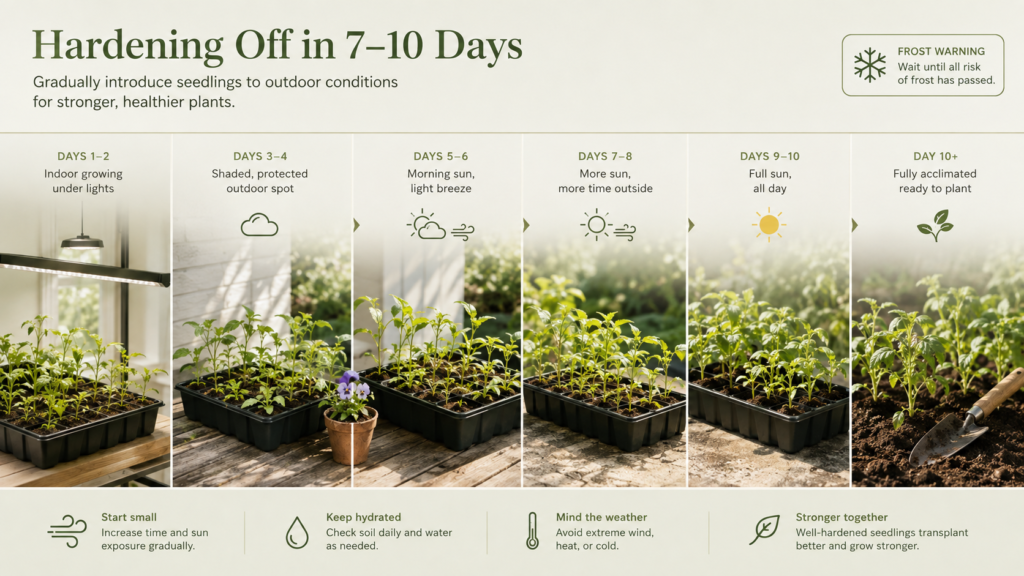
1. Begin roughly one to two weeks before the planned transplant date, depending on the crop and conditions.
2. Place seedlings outdoors for a short period in a protected, shaded location during mild weather.
3. Increase outdoor time and light exposure gradually over successive days.
4. Protect seedlings from frost, severe wind, storms, and unusually cold nights.
5. Keep checking moisture because small containers can dry quickly outdoors.
6. Once plants tolerate extended outdoor conditions, transplant them at the appropriate time for the crop.
How to Transplant Seedlings Outdoors
- Check conditions, not just the calendar. Warm-season plants such as tomatoes, peppers, eggplants, cucumbers, and squash should not be rushed into cold conditions.
- Choose a gentle time of day. Overcast conditions or late afternoon can reduce immediate stress.
- Water seedlings before planting. A hydrated root ball is easier to handle and less likely to dry during the move.
- Minimize root damage. Lift plants by the root plug or leaves when practical rather than squeezing delicate stems.
- Plant at the right depth. Follow crop-specific guidance; not every seedling should be planted deeper than it was in the container.
- Water after transplanting. Settle soil around the roots and monitor the plant closely while it establishes.
Frequently Asked Questions
1. What is the best way to start seeds indoors?
Yes, for most indoor-grown garden seedlings. Gradual outdoor exposure reduces the shock caused by suddenly moving from protected indoor conditions to full sun, wind, and temperature swings.
What is the best way to start seeds indoors?
Start with the correct timing, clean containers, a lightweight seed-starting mix, and a reliable plan for light. Sow at the packet-recommended depth, keep the mix moist but not waterlogged, provide appropriate warmth for germination, and move seedlings into strong light immediately after they emerge.
When should I start vegetable seeds indoors?
Count backward from the date you expect to transplant each crop. Tomatoes, peppers, and eggplants often need roughly six to eight weeks indoors, while many brassicas need around four to six weeks and cucurbits only a short indoor period. Your seed packet and local frost dates should guide the final timing.
Do all plants grow from seeds?
No. Many plants reproduce from seed, while others are commonly propagated from bulbs, tubers, rhizomes, runners, cuttings, division, grafting, or other vegetative methods. Even plants that can produce seed may not always be best or easiest to propagate that way.
Do seeds need light to germinate?
Some do, many do not. Follow the seed packet. Once a seedling emerges, however, it needs adequate light for healthy growth.
How often should I water seedlings?
Water according to the moisture in the growing medium, not a fixed schedule. Water thoroughly when needed, let excess drain, and avoid leaving seedlings continuously soggy.